Setting up the Cluster
Bill of Materials
- 5 - Raspberry Pi 4 (2GB RAM)
- 1 - TP-Link 8 Port Gigabit Ethernet Network Switch
- 2 - RAVPower 60W 12A 6-Port Desktop USB Charging Stations
- 6 - 1 Foot Cat 6 Ethernet Cables
- 5 - 32Gb Scandisk Class 10 Micro SD Cards
Links to purchase these devices can be found at the bottom of the page.
Initial Setup
The physical setup of the cluster is fairly trivial, simply connect all the Raspberry Pis to the network switch and power them up, unfortunatly they would then have no idea what to do.
Step 1: Flash microSD Cards
All of the micro-SD cards should be flashed with the latest version of the Raspberry Pi OS (formerly known as Raspbian.) The tool to do this is known as the Raspberry Pi Imager. The Raspberry Pi Organization actually provides a 45 second video on how to use the Raspberry Pi Imager, the video is attached below.
Step 2: Login and Set a Hostname
The next step is to power up each RPi and begin login using the default username and password.
Username: pi

                Password: raspberry
You will be prompted to change your password from the default upon logging in for the first time. From this point you can create any user accounts you want (however your shouldnt do this until the cluster configuration is complete) and continue to Step 3
Step 3: Assigning Static IP Addresses
In order to facilitate effective and reliable communication between the parent and child nodes a static IP address for each node is reccomended because not all routers and operating systems support accessing other network devices by hostname.
To create a static IP address, basic information about the network is required. To retrieve the domain name servers,
the file /etc/resolv.conf must be examined. From this point the file /etc/dhcpcd.conf> must be edited to contain the interface,
static ip address, router address, and nameserver address.
A full guide on setting static adresses on a RPi can be found here
The node must then be restarted using the sudo reboot command. For the scope of this project
the nodes have an IP range of 192.168.1.16[0-4] with 192.168.1.160 being the master.
Step 4: Port Forwarding
The SSH port of the master node must be port forwarded in order to allow external access to the cluster. The port forwarding process is router model specific and requires the reading of the documentation for the specific router. The default port that SSH uses is port 22, so the router need to be set up such that the port 22 is forwarded for the ip address of the master node.
Step 5: Setting up Passwordless Login though SSH
For the cluster to work properly, the master node needs to be able to communicate with the child nodes effortlessly.
To avoid the issue of password authentication on each program execution, a
SSH key needs to be generated on the master node by using ssh-keygen -t rsa command followed by deploying the
generated key to each child node using the command "cat .ssh/id_rsa.pub | ssh username>@individual_pi_ip_addresses 'cat >> .ssh/authorized_keys'
.
Step 6: MPI and MPICH Installation
In order to install the MPI, certain prerequisites are required to facilitate a clean installation process. These prereuisites must be installed on all of the nodes in the cluster. Because the cluster is built from cloned machines, the setup process is the same for each node, and as such a script has been developed to streamline the process.
Script Git Repository: https://github.com/joshuah459/clusterSetupUtilities.git
The simplist way to retrieve this script and transfer it to the RPi is through the use of the git utility
command. This command does not come preinstalled on the RPi and can be installed by using the sudo apt-get install git command.
Set up and run the script using the folowwing commands:
git clone https://github.com/joshuah459/clusterSetupUtilities.gitThis command downloads the contents of the software repository.cd clusterSetupUtilitiesMove into the directory of the repository.chmod +x ./setup.shMake the setup script executable../setup.shRun the script.
Repeat these steps for each node in the cluster.
Step 7: Master Node Hosts File
Modifying the /etc/hosts file to include the hostname and the IP address of each of the child nodes is essential to facilitate communication between the master node and the children. The node IP address should be appended to the end of the file in the format of the IP address followed by the hostname of the node as seen in the image below.
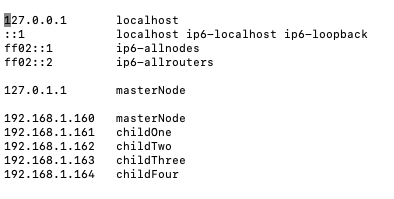
The hosts file should contain the hostname and the IP addresses of the children nodes in the cluster.
Step 8: Final Steps and Multi-User Setup (Optional)
Now that MPI and MPICH are both installed and the networking has been configured, its time to get the cluster user-ready. To do this several helper functions have been developed to streamline the clusters use. There is a repository set up to hold these functions.
git clone https://github.com/joshuah459/clusterProfiles.gitThis command downloads the contents of the software repository.cd clusterProfilesMove into the directory of the repository.cp ~/.ssh/id_rsa /installLayout/etc/skel/.sshCopy over the SSH key generated earlier (this is optional as it is a security concern, however the simplist way to make the cluster multi-user)
.ssh folder called config
The folder needs to be provided the username that has been set up on the child nodes (as they must all be the same name). The file should be formatted as follows:
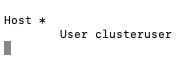
SSH config file
At this point the cluster is ready to have the user template installed using the following commands:
sudo cp -r ./installLayout/etc/skel/* /etc/skel/This copies the user skeleton from the repository into the Linux user skeleton folder.sudo chmod 600 /etc/skel/.ssh/id_rsaSets the SSH key permissions.sudo cp ./scripts/standard/user_profile /etc/profileCopy over the profile script that provides simplified cluster commands for the user.sudo cp ./scripts/admin/admin_profile ~/.bash_loginCopy over the profile script that provides simplified cluster commands for the administrator.source ~/.bash_loginReload the login profile.
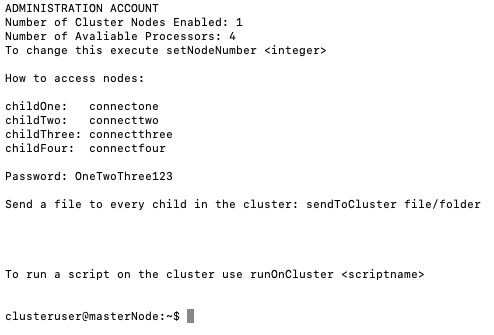
Login Shell
createClusterUser usernameCreates a user from the/etc/skelfile template and sets the password to12345and requires a password change on first login.createClusterUser username sudoDoes the same as the above command, but adds the user to the/etc/sudoersfile and copies the administration functions to that users profile.